Sunday, February 21, 2016

Merida: Wig Dyeing and Styling

Anyone who knows me, knows I have terrible ADOS... (Attention Deficit... ooh, shiny...) I tend to either get disinterested, frustrated, or run out of time to finish projects so I end up side-lining them and then never getting back to them.

I decided to pick Merida back up, (I had last posted this one in 2014) she was living on my bedroom floor for awhile, then when I moved realized I was pretty close to actually being done. Since I won't have any of my new costumes done for C2E2 and it's earlier this year, figured I'd give it another go.

I think I got discouraged when I got in a bad wig just before the last con I planned to wear it to. It's very hard to tell color online, not to mention finding a good, natural Red. I ordered one that looked good off of eBay, but many sellers were using the exact same picture. I wrote them, and they claimed it was their picture, but of course, they probably lied. This is what I ordered originally.


Looks great... except what I got was bright clown orange, and it was all set into a black foundation and wefting. I even tried to dull it down with dye, but it didn't work well. So, beware sellers using this picture, it's probably not what you are actually getting.

Next, I ordered this one from an eBay store that operates out of CA, not China. The pictures are kind of crappy and fuzzy. The wig I ordered, Electra, is very long and curly (may or may not be too thin depending on the volume one is going for). It has a light beige colored foundation, a hard front, and all the wefts on the crown are crimped and facing forward for volume. I wrote them and they claimed color #27C was a perfect Merida color and it's called light ginger. It's the brightest red they have in their color chart.


I found the red to be more of a bright strawberry blonde as opposed to a true bright red. The wig at least had a few different colors to it, so it at least had a natural look to it, so I decided to try and dye it to a brighter, natural shade.


I decided to look at Arda Wigs tutorial on dyeing wigs. It's for their fibers, dying white fibers, but I used it as a guideline. Since there was no orange iDye at my fabric store, I decided to get Tangerine RIT Powder, and some Cocoa Brown so it didn't go too orange.

Using a large lobster pot I use for dyeing fabric, I started heating it on a portable induction cook top I have. Note, I've had a hard time finding something to reliably get large pots of water boiling, and I will not dye in the kitchen. I mixed about half the packet of Tangerine and just less than half of the Cocoa. Based on Arda's information, the cocoa really turns more of a red than a brown. I pulled a strand of hair from the back of the wig and dipped it in the dye pot, and it was too RED red, so I threw in the rest of the Tangerine. My strand took 15 minutes to get to a color I wanted (Pull it out and dry it from time to time to get an idea of the color) so I threw the whole wig in. I guess the water got hotter, because after less than a minute it looked dark, so I pulled it out, rinsed it (cool water, bit of dish soap), and then dried a strand and it looked perfect.


It came out a very pretty 'natural' red. I haven't decided if I'm going to try and make it more orange or leave it like this. My Merida costume I'm going for historically accurate and realistic as opposed to living cartoon.

Next step, will be making the wig cap smaller and resetting the curl!

Wednesday, February 3, 2016

Tauriel

I had posted last year about my conundrum studying Tauriel's green deerskin outfit from The Hobbit. Well, I had gotten another of WETA's books from the movie which confirmed the conclusion I sort of came to when studying her outfit that they did indeed make a whole version and a short jacket version.


On the left in the 'dress' version she wears in Thranduil's chambers and the cell scene, on the right she's wearing a jacket with a separate skirt. They are implying that it's the same jacket, but they didn't want the extra skirt layer when she's wearing the raw silk overcoat. I'm guessing the 'dress' version was decided on later, and since the other version is covered by the cuirass, they needed to make a full version.


The 'dress' version has a panel down the front of the skirt that has binding on it, which is missing from the removable skirt. Also, I can tell from the close up in the Cloaks and Daggers book that the binding is silk, where the jacket version is binded with the same suede as the jacket. I've decided I'm making the dress version of this, and if I have enough suede left over, I will make a short jacket. I figure I can wear my cuirass over the dress and most people won't care about the extra line of binding down the front, since I don't see a point in making the removable skirt just for that.

I got two large hides of green deerskin to make this out of! I also found a sort of iridescent nylon fabric to make the undershirt out of. (And as you can see, the Weta Tauriel necklace!)

I also have the WETA Daggers for later!


Back to the jacket, I've patterned the body of it, and I'm making a full mock up, since I don't want to make any mistakes on the leather, and I'll work on the sleeves when that's done. I'm really loving the collar on this.


I've also been working on a pants pattern. Tauriel wears leather pants, the best pictures of it are from the Weta figurine, such as this:


So, I've made a version in stretch denim. I had a little fun and put some of the Elven leaves from her bracers on the back pockets.


So right now I have a lot of patterns, mock ups, props and supplies so I hope I start seeing something wearable real soon!


Tuesday, October 27, 2015

Hoth Leia: Patterning and Using Photoshop for Recreation Costuming

I know, I know, I have to post White Witch Build thread info. Hopefully I'll get to it soon, been a bit busy getting ready to move! I'm really excited about it because, while it's still in town, it'll be away from the major road/bar neighborhood I'm in right now. My sewing room will be smaller, but I won't have to share it and am moving storage elsewhere so it'll house mostly my sewing, cutting table and dress forms. We'll see how that goes!

My current project is Hoth Leia from Empire Strikes Back.


I had started this last year, but got frustrated with patterning issues and was distracted by prettier, shinier things and put it away. Needless to say, with The Force Awakens coming up in December, I need a cold-weather costume. I have Rebel Legion troops at the release, the Symphony, and the Blues Hockey game, so my interest is renewed. I had been researching for awhile and besides my own notes and Rebel Legion, I use Padawan's Guide as a resource. I started with the vintage Kwik-Sew Pattern 2624 that was mentioned as being used by another costumer.


Looking at the picture, it didn't look grossly oversized and had similar seam lines except for the princess seams. For once, there were measurements on the envelope that were smaller than I was (I'm the size Carrie Fisher was back then, perhaps with a bigger bum :p ) Looking at the pattern pieces, I cut out the XS anyway because it all looked larged.

Honestly, I am not sure I can recommend this pattern. I thought I'd save myself the hassle of drafting it from scratch and would just be altering. It might have been less work to draft this from scratch!

I had to add the princess seams, I had to take maybe 3 inches off of all sides to make it remotely fit, shorten the crap out of the bodice, restructured the armscye's, and wanted to rip my hair out trying to resolve crotch fit issues. I must have tweaked that thing 20 times before ripping it out and "draping" it, and finding out the rise wasn't right at ALL. It honestly might be better to frankenstein something more fitted together.

USING PHOTOSHOP AS A TOOL

When I recreate a piece, I basically save and capture every picture I can find from every angle I can find it in, and drape and pattern my piece based on my observations and notes. I usually spend months drooling over/obsessing over all the details well before I even start the project. The things I note when I am studying are:

-What seams are there
-Where do those seams fall on the body
-What understructure do I need to make the silhouette

Since I usually do movie costume recreations, I'll go through and capture pictures, especially during movement so I can see all the angles. I watch every special feature I can get my hands on as well as B-Roll footage that comes out on the net. Exhibit pictures are my best friend (since they rarely have these exhibits in my neck of the woods). I built my Alice costume before the movie came out on Exhibit pics alone. 

Once I have my mock-up built, I like to try it on and take pictures of myself in it recreating poses from some of the best reference pictures I have. It's a good idea to marker in your seam lines so they are visible when working with the pictures. Simply speaking, you can use any photo editing program that lets you work in layers. I have an older version of Photoshop, CS2.


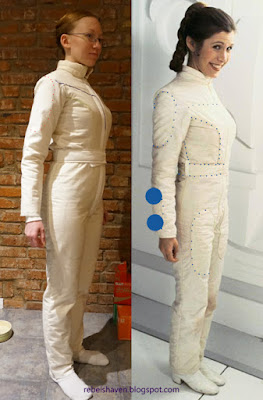
Here's an example. The angle could have been better on the camera, but I'm camera shy and had someone helping me. Usually, I set up a tripod and take dozens of pictures until I get the right angle and pose. The blue ribbon you see on my chest was a proposed seam adjustment I knew I had to make. Since this is a lot of white on white, I copied my reference picture (never work on the original!) and added dots to all the lines I was trying to match up. I did the same on the picture of my muslin. (The large round circles you see on Leia's arm were me testing a theory that her quilted patches were perfectly circular on the curves.)

Next, I layered the two images together.


My Leia reference picture, I changed the opacity of the layer so I could see through her but still see her shape. (By 'change opacity', I mean to change how solid or see-through the image is, which in photoshop can be done in the layers menu). I 'Transformed' this layer to be my size and shape. It is important to transform the layer, not change the size of the overall image. To transform, select the layer you want, and select Transform from the Edit menu, or simply hit "CTRL+T". Boxes will appear around the selected image. You may have to zoom out. You will want to hold down the shift key and drag the box from a corner. Holding shift will keep your image to scale. Adjust your reference image until it is your same height. Look at the face, the facial features should approximately line up. Also try and line up things like shoulder, waist, etc.

Now, I lucked out in that I am basically the same build as Carrie Fisher; she's only an inch taller than me. More often then not, we are not the same proportions as the actors who play our characters. All that matters in recreation costuming is that proportionally, your lines match up. I have seen many good costumes not reach their potential because the seam and hem lines just didn't hit where they should. For instance, the quilted squares on Leia's vest may be 3" square on her, but on someone taller they may need to be 3.25" to have the same number of squares in the vest. The final measurements don't matter so long as everything is proportional.

How do we fix it? I don't have pictures of this part, but basically you will resize your reference layer to match you (not the other way around) to see where the lines hit on you. When you held shift while transforming, it kept the image to scale. If the reference is taller, shorter, skinnier or up a size or two from you, you can skew the reference layer whichever direction it needs to go to make it match. If you run into a problem where, say, you are more short-waisted then them or have longer legs, you can marquee select part of your reference layer (that is the tool that looks like a box with dotted lines) and drag it over part of the image, say, to the waist, and CUT the selected piece (CTRL + X). Create a new layer and PASTE (CTRL + V). Now you have two separate halves which you can stretch and shrink independently until you get something more proportional to you.

Based on this, I was able to make the necessary  adjustments to my seam lines until they lined up more closely with hers, and I will have a more accurate product for it.

Another use for photoshop:


Creating an image like this really helps for reference when designing your pattern. You can brighten and sharpen images until you can see the details you want. I drew a few lines on here and used my protractor (holding it on my screen, though there's probably a more technical way to do it) to get the angle these stitches go. You can even go so far as to make a layer with a 1" grid, scale your reference photo to the approximate size you think you need, and print off a reference to start your pattern with! (Be sure to erase anything you don't need to conserve ink!) Doing this saved a lot of time and guesswork when starting the pattern for these quilted pads.

I hope this info proves useful :)

Sunday, August 16, 2015

Brace Yourself...


Just a small teaser before Dragon Con ;) I'll post my build info once I debut it!

Tuesday, July 28, 2015

Dragon*Con Countdown update

I know I've been a bad little blogger this year. I've been having a slight crisis deciding how much information to share online since I've had a few incidents where I've been taken advantage of. I had someone steal my Hogwarts skirt picture to sell copies on Etsy, I had a chinese company steal the Alice embroidery design I shared for free for fellow costumers, and I had someone create a DeviantArt account solely to tell me she 'just hoped I didn't debut my White Witch costume at D*C this year because she'd hate to be in the same dress as another girl', then proclaimed she was entering hers in the same contest I've been planning to enter mine in for 4 years. Needless to say I've been reluctant to put info of my build out in the net until after said contest is over (because so far, this is my biggest build!)

Anyway, I've had to strike a few things from my list this year because White Witch takes first priority. After 4 years, I am so ready to debut it and move on. I didn't get to the Luna wedding outfit but I now have earrings to wear with my school uni. Tauriel, if I get the leather coat and wig finished, will be just bare bones. I'm on my first coat pattern draft, and I have the leather, wig materials, pants pattern and base boots. If I can finish the wig and coat it'll be just wearable enough for Dragon*Con.

The White Witch is coming along and WILL be done this year. I finished the leather bodice, have the lion mane shawl together, acquired some props, and am working on the crown and the wig. I'll share all that after D*C because I'd like to post the finished product first!

But first, I can't leave without posting something shiny, so here it is...


THE CHAINMAIL SKIRT IS FINISHED. Almost 4 years of work, 82,000 rings, it weighs 7lbs, 2oz.

Monday, May 4, 2015

Tauriel and the Disappearing Skirt Debate

Sometimes, I feel that movie costumers pull some evil tricks on us recreation costumers!

I am currently in the process of my final research before drafting the coat for my Tauriel costume from The Hobbit (more on White Witch later... plugging along on it, but not making my research public until after Dragon*Con) but I've hit a little snag. Parts of Tauriel's costumes like to disappear.

Tauriel basically wears a couple of costumes that are layered up in different ways, and it is also sometimes inferred in the movie that she's wearing one costume under the other, for instance, she enters Bard's home in her green jacket, leather bodice, and travelling coat, but when she's healing Kili, she's suddenly in her crinkled tunic look, as if that outfit was underneath the other one.  In the book, they do admit they had removable skirts because they didn't want a lot of skirt layers.

Here's my predicament. I intend to make the version with the green deerskin jacket, and with the leather bodice once I get to it.


Now, here's the description of this green jacket from WETA's Desolation of Smaug Chronicles book:
"Beneath her coat and cuirass Tauriel wore a fine deerskin green jacket. The jacket had long sleeves made in four parts, exquisitely faggoted together by Katherine Pepperell in gently curving lines down her arms.
The original line of the costume had a smaller collar. Fran liked the line, but wanted a bigger collar, which turned out to be a very good call. From concept to delivery, the entire costume had to be created in just two weeks. We had so little time that we simply added a second collar which unfolded over the top and serendipitously ended up looking very elegant, carrying the line that started down her front all the way up and into her delicate ear tips.
The travelling coat had skirts to it, but when Evangeline wasn't wearing it we had a second skirt that went with her jacket. It would have been too many layers and added too much bulk to have both skirts on Tauriel at once, so she always wore one or the other. We created a subtle leaf-like veining that organically traced its way across the suede and was applied by Johnny Brough and Daniel Falconer in the paint department at Weta Workshop."

Now, here's an interesting picture:


The jacket in picture D is the one that is pictured in the book, and she can be seen wearing just this jacket (with a brown top) when she is talking with Thranduil and with Kili in his cell. I had assumed that they simply added the leather cuirass on top of this same jacket, however, it also said removable skirts. Looking at picture D, you can see a piping/stitch detail that runs the length of the skirt, and starts all the way up past the waist seams, so I don't see how this is removable. If you look at pictures A and B, the skirt on her jacket does not have that seam travelling down the front of the skirt. They made it sound like they had so little time I thought they only made two jackets (one for her stunt double), but perhaps they made one full coat, and one short jacket that the skirts could be switch out (because there definitely is no deerskin skirt tails under her raw-silk travelling coat). Picture C is from a BRoll or production diary, I have no clue if this is showing the jacket without any kind of skirts, but I see no lines from the lacing otherwise. (It might be a version she wears with the stunt harness?)

Things that make costumers bang their heads. Now I can't decide how to build mine since I'd like to wear it both ways, and also with the travelling coat, but I see no way to make the skirts separate!

Sunday, February 1, 2015

Quick Luna Update

This is the time of year where I am usually drafting patterns and collecting materials, so I usually have nothing to show for quite awhile, but I do have something small to show for myself!

Last year at Dragon Con, I took my Ravenclaw uniform I'd made in college and worn as a casual comfy costume into Luna Lovegood simply by adding a wig, Spectrespecs, butterbeer cork necklace and want, and strangely it was the most popular costume I wore all con. This year, I've decided to do a new Luna costume, her yellow dress she wore to the Weasley wedding in Deathly Hallows.


I have some awesome friends who have made clothes from the wedding so I'm excited to get to wear this with them at D*C this year. I don't plan to officially start working on the dress until after April, when I plan to have the White Witch finally done, but since I've been home sick all weekend, I've been having a Harry Potter marathon and had finally figured out how to make the radish earrings! I wanted to go the seed bead route like Evanna Lynch did for the movie. Finished one of two:


There is a larger bead in the center, and I had threaded an end pin through a smaller bead at the bottom which I attached an earwire to. The top half of the beads were put on using a thin wire, but I switched to beading thread for the second half so I could thread back through and try and secure some of the layers. I also used beading wire for the leaves. It's not perfect, but it's homemade like it should be :)